Epson Perfection V300 Scanner in Ubuntu 8.10

Here follows a quick description of getting an Epson Perfection V300Photo running in Ubuntu 8.10 Intrepid.

epson_v300_photo

Firstly, the scanner has sane support but requires a ‘non-free’ (as in speech) driver element.

Thinks you need:

Make sure sane and sane-utils are installed:

sudo apt-get install sane sane-utils

Then you will need to ‘borrow’ libltdl3 from Ubuntu 8.04. You can find it here: http://packages.ubuntu.com/hardy/libltdl3

And finally, you need iscan and the esci driver as DEB pacakages from AVASYS. You need to go through the form-driven system here: http://www.avasys.jp/lx-bin2/linux_e/scan/DL2.do

Once you’ve installed that little lot, you need to add a line  to one of your sane config files:

sudo gedit /etc/sane.d/dll.conf

Add epkowa to the list of drivers found there.

You should now be able to use Xsane or any program which calls Xsane (such as GIMP) for scanning.

I’ll readily admit, it’s a really clunky installation process. It seems largely Epson’s fault. The do provide the Linux driver but it’s a binary and doesn’t appear to be licenced in a way which would enable it to be bundled with a Linux distribution. It would either require Epson to release the sourcecode for their V300 driver or for someone to successfully reverse-engineer the scanner software interface for this to become easier ie: direct sane support.

References:

http://ubuntuforums.org/showthread.php?p=6297403
http://ubuntuforums.org/showthread.php?t=978407

Swapping PCI for USB to save energy?

After discovering that Hauppauge WinTV NOVA-T PCI cards seem to draw anything up to 9 watts each when in operation, I’ve been theorising about ways and means to reduce the overall power consumption of a MythTV ‘backend’ server.

One option I considered was replacing two NOVA-T cards with a single NOVA-T 500 which has two tuners. The glaring problem with that approach is that I have no means of knowing before-hand whether the NOVA-T 500 doesn’t just draw twice as much power as a normal NOVA-T.

The other alternative I’ve considered is a NOVA-T USB Stick. It’s a really simple device involving a USB connector at one end and an aerial connector at the other. In theory, the limitations of the USB system should dictate that one of these sticks will not require more than 2.5 watts (more likely no more than 2 watts).

Hauppage NOVA-T USB stick

If so, I would be limited to one stick per USB slot but that’s no great hardship as I have at least four USB slots to play with.

There is a catch though, having done some reading out on the intertubes, it appears there is a problem with tuning on the NOVA-T sticks and the current version of Mythbuntu (which I have used to configure MythTV systems up until now)

Using a Draytek router to ping clients via telnet

I recently needed to check the availability (or rather pingability) of a system on a remote network. I didn’t have a VPN connection to that network but I did have administrative access to the network’s router which was a Draytek Vigor 2600.

As well as the expected web interface, the Vigor 2600 (as with many other Draytek routers) also includes a telnet server with a suite of command line tools.

To telnet to the router from both Windows & *nix systems you use the command:

telnet <router ip or hostname>

You will then be prompted for a password. This password is the same as the web interface password.

Once logged in, you can type ‘?’ and expect to be presented with a set of available commands which may look roughly like those below.

% Valid commands are:
upnp         ddns         exit         ip           ipf          ddos
urlf         p2p          log          quit         srv          show
mngt         sys          vpn          wan          port         wol

The ping command is a subcommand of ‘ip’ so to use it we type:

ip ping <host ip address>

The router will then send five pings to the target host and display a report of each ping, latency and packet loss.

I hope this comes in handy for others 🙂

Presario 2100 Frequency Scaling with Ubuntu

I recently installed Ubuntu Linux 8.10 on a Compaq Presario 2100 laptop. Specifically, this model of the 2100 series has an intel Celeron mobile processor which nominally runs a 1.7Ghz.

Naturally, on a laptop you don’t want to be running you CPU at full-chat all the time as the fan can be noisy and the flesh on your legs may burn. By default, Ubuntu didn’t work out how to step down the speed of the CPU which is unusual.

I could swear that I’d had this laptop throttling it’s cpu frequency before and with a little brain wracking and internet searching, I [re]found the solution.

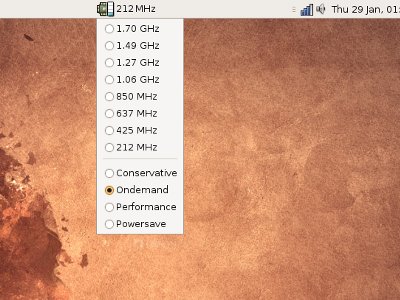
You need to activate the p4-clockmod module using the command sudo modprobe p4-clockmod. Once this is done, you can activate the Gnome panel cpu frequency applet (right-click panel>Add to panel>CPU Frequency Scaling Monitor)

cpu_widget_ubuntu

You should now be able to choose a speed from 1.7Ghz down to 212Mhz from the list or select one of the automatic speed governors.

You still need to make sure that the kernel module is loaded every time at boot time. To do this, use sudo gedit /etc/modules and add the line p4-clockmod.

Now, every time your machine starts, the cpu governors will be activated and you’ll hopefully have a quieter and cooler experience.

Undervolting/Underclocking an Athlon XP for energy savings

Over the last few years I’ve set up a few MythTV systems and in general these systems tend to stay switched on 24/7 all year long. This comes to be a problem when you consider the cost of electricity these days. The obvious solution is to make the MythTV backend server use less energy.

Speculatively, I’ve been looking at an old AMD Athlon 2500 XP Barton which I’ve had knocking around here for who knows how long. The system was well specced as a desktop in it’s day with an Abit NF-7 (non SATA) motherboard, 1 gigabyte of OCZ PC3200 RAM, a DVD/RW, a Seagate Barracuda and a GeForce 6800 AGP with 128MB RAM.

The power supply was a high-end (at the time) Antec True-control 550.
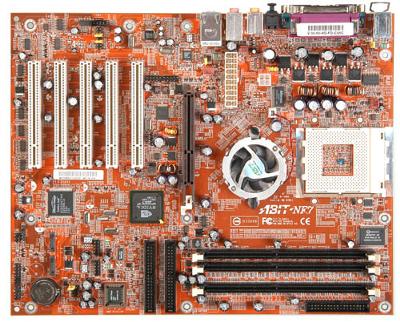
Abit NF7 motherboard

Abit NF7 motherboard

Just briefly going off my own topic: The NF7 had/has a minor ‘overheating’ problem. In the middle of the CPU socket, there is a temperature sensor. If it does not make physical contact with the underside of the CPU die, the BIOS thinks the CPU is overheating and shuts the machine down. The simple remedy is to carefully bend the sensor upwards until it stands just fractionally proud of the socket, thus ensuring good thermal contact when the processor is installed.

Also present due to past presentation were a Pinnacle TV encoder card and a PCI Firewire card.

To kick off the experiment, the BIOS settings were set to their defaults which saw the system drawing about 138 watts idle and 150 watts under load (not taxing the video card). I used burnK7 from the package ‘cpuburn‘ to apply a load to the processor. Cpuburn is also available for Windows. I metered the current drawn using my handy digital plug-in meter (Kill-a-watt style device)

Initial BIOS config giving 138 Watts idle / 150 Watts load

  • External Clock       166Mhz
  • CPU multiplier       x11
  • FSB                             333Mhz
  • CPU Core volts      1.65v
  • RAM volts               2.6v
  • Chipset volts          1.6v

Not one to mess around, I quickly worked out the lowest speed I could run the CPU at on the principal that lower clock speeds would draw less power and also allow me to run lower voltages. My Barton core was a non-mobile post week-40 chip so it was hard-locked at 11x multiplier. Therefore I had just the FSB to play with. Happily, reducing the FSB to just 100Mhz gave a CPU speed of 1100Mhz.

I then hunted around for the lowest stable voltages for each of the CPU core, Northbridge and RAM power options.

As it happens, the RAM is specced for 2.6v and the BIOS did not offer any options for going lower than this so the RAM voltage was duly ignored. Next up, the Northbridge power allowed settings down to 1.4v and that is where it went. The CPU took a little more figuring out and thus far, it has been stable at 1.15 volts. A significant drop from the stock 1.65 volts.

This configuration gave an impressive power consumption reduction; about 80W at idle and 90-95W under full load (excluding graphics load)

BIOS config giving 80 Watts idle / 95 Watts load

  • External Clock       100Mhz
  • CPU multiplier       x11
  • FSB                             200Mhz
  • CPU Core volts      1.15v
  • RAM volts               2.6v
  • Chipset volts          1.4v

Still, there was quite a bit plugged into the system itself so I went hunting for more power savings. I couldn’t ignore the fact that there was a hulking great Nvidia Geforce 6800 in the AGP slot, presumably taking up lots of power. There was also an old encoder card and the firewire card in there.

I managed to root out an old PCI ATI Rage Pro card with a stonking 8Mb of video ram so out came the Geforce and in went the card from the ark. The encoder card, firewire card and DVD/RW drive came out too and the system was rebooted. In it’s new, leaner configuration, I was pulling about 20 Watts less, 64 Watts at idle and 75 Watts under full load.
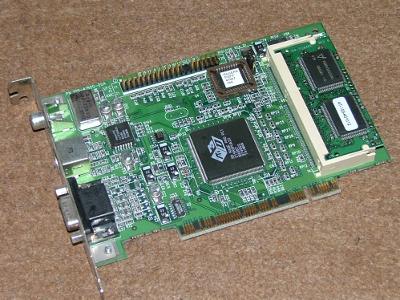
Ati Rage Pro - Note the memory module taking it from 4Mb version to 8Mb!

Ati Rage Pro - Note the memory module taking it from 4Mb version to 8Mb!

By this point, I was already using lm_sensors to monitor the system temperatures and voltages. I was pleased to see that, when idling, the CPU temperature was a trivial 28’C and even under full-load this was only rising to 33’C 🙂 A note here: The cpu was fitted with a huge slab of copper and aluminium pretending to be a heatsink with a noisy (at 3000RPM) or ear-splitting (at 5000RPM) fan.

A quick tip: To see the output of the ‘sensors’ tool in real-time, use the ‘watch’ command ie: watch sensors

Being a bit of an adventurer, I decided to disconnect the case fan and the cpu fan and boot the system to see if it fried.
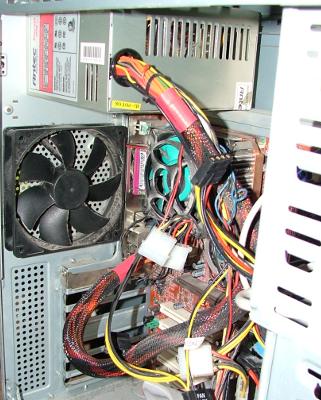
Inside the box showing the cooling arrangements (or lack thereof)

Inside the box showing the cooling arrangements (or lack thereof) Note the big copper slab and attached prongs over the CPU socket 😉

Happily, it didn’t fry. In fact, the idle temperature only rose to 38’C with passive cooling. There was still a bit of airflow afforded by the power-supply fan. However, running cpuburn for 20 minutes or so saw the temperature rise to over 65’C which I considered was pushing it a bit. I think that the CPU would be fine with one of those slim/low noise 80mm fans attached in place of the high-speed monster which it currently wears.

Checking the power meter, I now had just 58 watts idle / 70 watts under load. Interesting that the fan wanted so much current but like I say, it’s hardly an ordinary fan.

I also made a quick experiment in putting the hard drive into ‘suspend’ mode using hdparm -y /dev/hda1 this produced a further 4 Watt drop in current draw 🙂
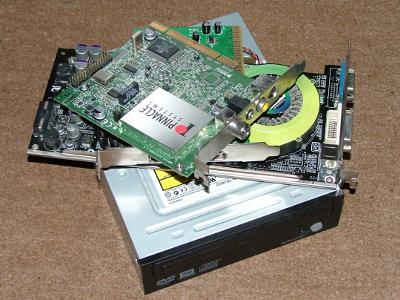
Bits removed to save energy, DVD/RW, GeForce 6800, Firewire and TV cards

Bits removed to save energy, DVD/RW, GeForce 6800, Firewire and TV cards

Of course, it wouldn’t be much use as a MythTV backend server without any encoder cards so there would be three going into the PCI slots. I’ve previously tested some Hauppauge WinTV Nova-T cards and they seem to draw about 9 Watts each in almost all conditions. With three cards in and a smaller CPU fan installed, I’d expect a further 28 Watts of power draw bringing me up to about 86 Watts idle and ~96 Watts load.

Although the only DVB encoders I have to hand are Nova-Ts, I’d like to see what the current draw is on one of the Nova-T 500 twin encoders and if any savings can be made by employing one of those instead of two of the single encoder versions.

All in all, I’m quite happy with the energy saving. It actually draws less power than my old laptop although I do conceed that the laptop has an integrated display to power.

Fixing “locales” error on Ubuntu

On a Ubuntu 8.04LTS server, I recently had an annoying case where the system would spew an error out seemingly every time a command was executed.

The error format was thus:
perl: warning: Setting locale failed.
perl: warning: Please check that your locale settings:
LANGUAGE = (unset),
LC_ALL = (unset),
LANG = "en_US.UTF-8"
are supported and installed on your system.
perl: warning: Falling back to the standard locale ("C").
perl: warning: Setting locale failed.
perl: warning: Please check that your locale settings:
LANGUAGE = (unset),
LC_ALL = (unset),
LANG = "en_US.UTF-8"
are supported and installed on your system.
perl: warning: Falling back to the standard locale ("C").

Clearly something wasn’t happy and that something appeared to be my ‘locales‘. They are actually quite self-explanatory, they define the language and location of a user in order to allow the correct presentation of the user interface. Great if you want to avoid having to read Kanji on the command line but not so much use if it’s just Crontab talking to the root account and filling up the mailbox with errors.

With a bit of searching, I found a simple enough answer. Obviously, as the error states, the locales need to be set. To do this issue the command:

sudo locale-gen

You can add your preferred locale to the end of this ie:

sudo locale-gen en_US.UTF-8

…which will generate the US English interface language with UTF-8 character formatting.

Then issue:

sudo dpkg-reconfigure locales

Hopefully, your locales will be set and that annoying error will be banished both from the console and your root inbox.

Credit to this thread at Ubuntu Forums