Acer Aspire 5315 screen replacement guide

Here follows a procedure for the removal and refitting of the LCD panel on an Acer Aspire 5315 laptop.

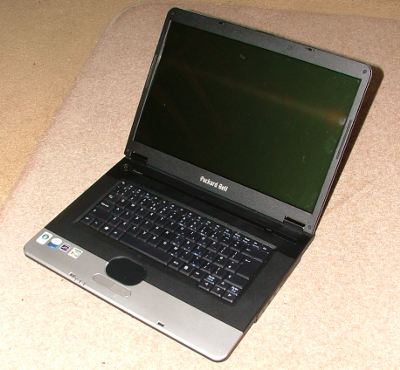
The subject machine displayed a corrupted display with a ‘wave’ shape and verticle lines obscuring the image with the right-hand side of the panel blank. This indicated the the LCD panel itself had failed, probably due to impact from a foreign object or excessive torque being applied to the screen during opening/closing of the lid.
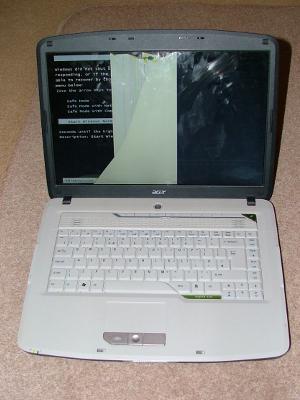
acer-5315-broken-screen

A replacement panel was sourced and fitted using the following method:

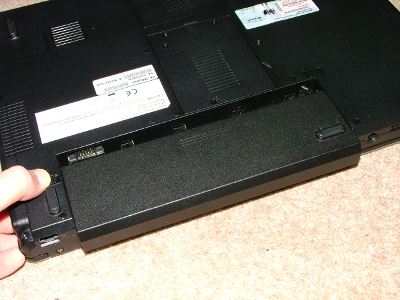
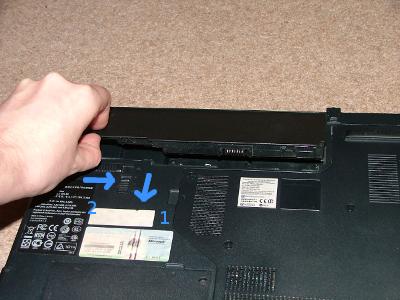
First the power lead is disconnected and the battery is removed. The battery has a two-stage lock and release mechanism as shown in the picture below.
acer-5315-battery-removal

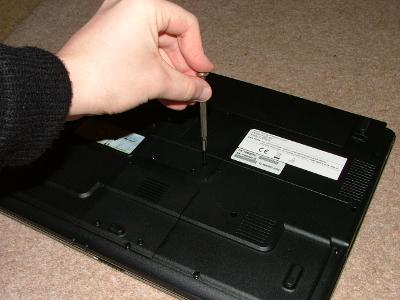
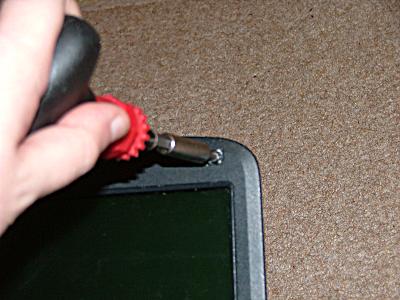
Four rubber pads now need to be removed to expose the fascia securing screws. I managed to use my fingernail to remove them, it may be neccesary to use tweezers or a sharp implement to prise them out.
acer-5315-screen-removal

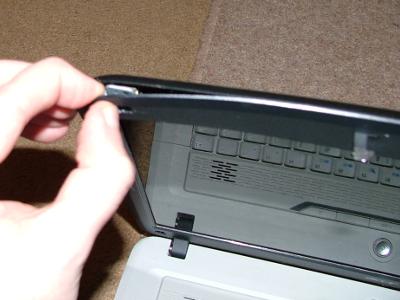
Once the four screws are removed, the screen fascia is carefully pulled apart. The circumferental clips are made of quite flimsy looking plastic so it’s wise to be careful.
acer-5315-screen-removal-2

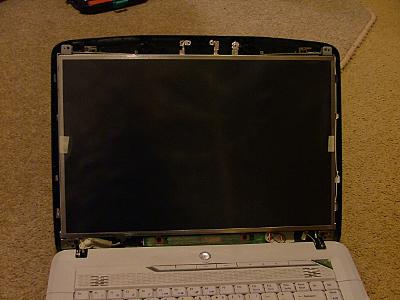
There is a connector at each end of the inverter board. These connectors were pulled out now. They are keyed to assist reinsertion later.
acer-5315-screen-removal

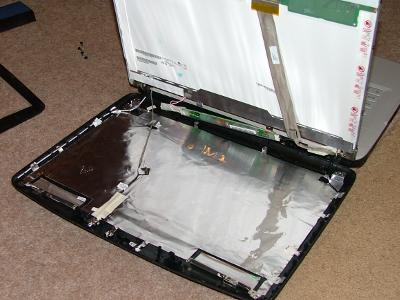
With the fascia off, the remaining screen securing screws are visible. The bottom two plus the inverter-board securing screws need to be removed. The back of the screen can then be pulled down further and laid flat.
acer-5315-screen-removal-4

The video connector is held in place on the top of the back of the screen with a clear adhesive patch. I carefully peeled the patch away from the screen from the top downwards. Do not remove the patch from the connector itself. Taking a careful hold of the connector, I pulled downwards to free it.

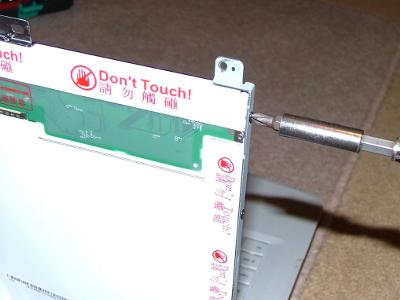
There were now 8 more screws in the side of the screen holding it in place on the hinge frame. I remoed them from bottom to top so that the screen was supported as long as possible. With the screws out, the screen can be removed.
acer-5315-screen-removal-5

In the case of the replacement display I had, there was a clear cellophane protective cover taped onto it. I left this on while preliminary reassembly was performed.

I inserted the screen back into the hinge frame and refitted the screws, I worked from top to bottom to keep support on the screen, at all times being careful not to slip and run a screwdriver into the screen surface! ๐Ÿ˜‰

Once the screen was secured to the hinge, I reinserted the video connector. In my case, a surprising ammount of force and care was required to get the connector all the way in. The likely symptom of a mis-inserted connector would be an all-white screen on power up. With the connector back in place, the adhesive pad was carefully pressed to the back of the screen. Bear in mind at this point that pressure had to be applied against some very sensitive electronics.

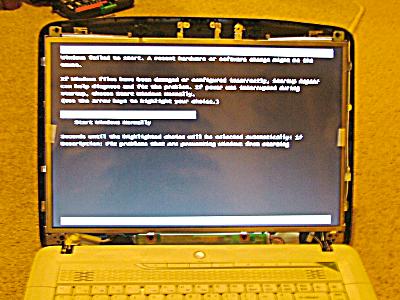
The inverter board was reconnected and refastened to the screen backplate. Care was taken to make sure all contacts are made and the wires taped back into place. This was the last opportunity for a test prior to final reassembly. I reinserted the two lower screws for the screen and the two upper screws which would normally also hold the screen in place before trying a test:
acer-5315-screen-testing-2

All was working, so I removed the battery again and the two top/front screws from the panel. I then removed the plastic cover that had come with my screen.

Care should be taken when refitting the fascia that all of the cables that pass through the screen hinges are located in the troughs and that they will not be pinched by the hinge or fascia. Replacement of the fascia is the reverse of the removal process. I gently pressed the fascia back together with fingers only and then reinserted the four retaining screws around it’s periphery. Finally, I reattached the adhesive rubber pads over the screw points.

Remember, machines under warranty should be repaired by service calls. Any work is attempted at your own risk.

To prevent reoccurrance:

The Acer Aspire chassis is by no means the stiffest/sturdiest I’ve ever come across so to stop the same problem happening again, I recommend:

  • Sweep hand across keyboard prior to closing the lid to check for foreign objects
  • Close and open the lid using both hands at the outer corners working in unison. Use the minimum of force required
  • Never place items on top of the laptop when it’s lid is closed (or at any other time for that matter)
  • Never touch the screen with your finger or any other object

[ad name=”articlebox10″]

Logitech Quickcam S 5500 for Business with Ubuntu review

Having never tried using a webcam with Ubuntu, I recently picked up a Logitech Quickcam S 5500 – more specifically, the ‘for business’ model.

As far as I can tell, the ‘for business’ version denotes the package rather than any difference in the camera itself. The package was a minimalistically small box with the camera, a compact disk and a manual tucked inside. The exterior motif was simple, just a picture of the camera, a ‘certified for Vista’ logo and a product code panel. This is the sort of packaging that really makes sense, the box is no bigger than it needs to be and doesn’t waste materials which will ultimately be disposed of.

quickcam_s5500_for_business_box

The included software (this may be the distinction of the ‘for business’ moniker) is Logitech’s Quickcam for Enterprise on a CD. Presumably, the consumer oriented version of the S 5500 package would come with different software. Unfortunately, from the point of a review, I left the software in the box untested as I would be connecting this camera to a Ubuntu 8.10 system with which the software would be incompatible.

quickcam_s5500_1

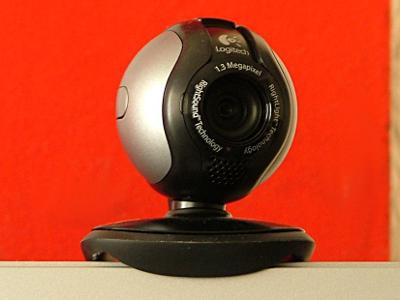
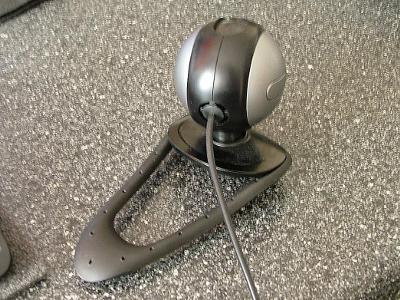
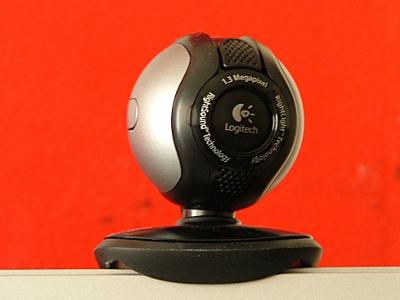
The camera itself is just a bit bigger than a golf-ball with a ‘poseable’ foot/mount and a slide-down lens cover. The sensor is a true 1.3 megapixel unit having a native resolution of 1280×1024 pixels. The USB lead which conveys both video and microphone audio from the camera is about 2 meters long and comes with a thoughful tag near the USB connector which identifies the device to make it easy to find it when unplugging it from a USB hub.

quickcam_s5500_back

Having connected the device to a Ubuntu 8.10 box, ‘lsusb’ reports:

Bus 002 Device 001: ID 1d6b:0001 Linux Foundation 1.1 root hub
Bus 001 Device 004: ID 046d:09a1 Logitech, Inc.
Bus 001 Device 001: ID 1d6b:0002 Linux Foundation 2.0 root hub

The two ‘hub’ entries are also apparently generated by the camera.

If found the camera to be working quite literally ”out of the box’ with xawtv. The camera complies with the “USB Video Class” webcam standard and is already supported by the Linux UVC drivers. Sadly, the included luvcview application which allows finer control of the cameras features wasn’t working with the S5500 so I ended up pulling the trunk sources from their git repository and building them myself. This got luvcview working and allowed manual control of the cameras exposure settings.

Logitech includes what they call “Rightlight Technology” with this camera. Put simply, the camera varies it’s exposure duration automatically depending on the available light. For instance in broad daylight, the camera will perform at 30fps. With only the light of the computer monitor on my face in a darkened room, the camera will continue to produce a good quality image at a much lower frame rate (typically 5fps). When changing the exposure manually, you are directly changing the frame rate. The sensor still captures a suprising amount of detail when deliberately set to underexpose.

The field of view is reasonably wide although not excessively so. You could confortably sit two people at a reasonable distance from the screen in front of the camera and have them in frame. The picture is generally quite sharp and well focused – the lens appears to be fixed focus – but there are some minor abberations at the edge of the image presumably caused by the size and type of lens in use. It’s still an extremely good quality image for a webcam.

Again, in the true tradition of being the most annoyingly lax reviewer ever, I neglected to test the integrated microphone which appears to sit just below the lens. The bezel touts “Rightsound Technology” so perhaps this microphone provides automatical level seeking.

There is also a button on the left side of the camera which would provide call activation/cancellation features in some Windows software but doesn’t have a default purpose on most Linux based software.

From the end user perspective, it’s ever so slightly early days for UVC cameras on Linux. Ubuntu 8.10, while supporting the Logitech S5500 has some shortcomings. For instance, Ekiga, the packaged software videophone doesn’t support UVC cameras in the shipped version. I reckon it’ll all be pretty much plug-and-play by the time Ubuntu 9.04 comes around in April though. The latest versions of Ekiga which will be packaged with Jaunty Jackelopeย  already supports UVC.

quickcam_s5500_2

Finally, the packaging reduced ‘for business’ version of this camera that I bought was actually a bit cheaper than the consumer counterpart.

I’m definitely recommending this product as a quality webcam. Naturally, I don’t intend to use it as a normal webcam but rather I intend to try using it as a security camera in conjunction with Zoneminder. ๐Ÿ˜‰

Fujitsu Esprimo Green – Zero Watt PC?

According to an article at geek.com, Fujitsu reckon they are going to demo a PC at CeBIT 2009 which will idle/sleep at zero watts ie: no current draw whatsoever.

The article speculates that this system will still be able to interact with LAN/PAN devices while ‘asleep’. This definitely runs into ‘believe it when I see it’ territory for me. It’s not that I don’t want Fujitsu to have accomplished this; computers definitely need to draw much less power when idle, but it’s a hell of a technical mountain to climb.

The whole notion of a NIC being able to respond without power only when polled intentionally just seems ever so slightly far fetched.

If you’re going to CeBIT on 3-8 March 2009, you’ll probably be treated to a demo of just how this works. Still I hope they demonstrate the device as coupled up to a proper metering device. I wouldn’t want to think that this is all just marketing and spin ๐Ÿ˜‰

WordPress SSL Administration

If you’re a WordPress blogger who finds themselves out and about while blogging, you may benefit from the addition of secure/encrypted SSL logins and administration of your blog.

Lets say you are in a hotel for the night after a conference and you want to post an update on the days proceedings for your readers. The delightful 5-star hotel you booked yourself into has thoughfully provided free WiFi internet access in the rooms and your laptop can see the access point and has connected. Well, this is great but consider what that connection actually is for a moment.

The chances are that the connection used no authentication and is entirely unencrypted. Any data you send or recieve over the connection goes in the clear; including your WP login and password. Remember that wireless internet is a radio connection. Anyone with ill deeds on their mind a ‘radio’ of their own (ie: a wireless laptop) can record your data transmission and pick through it at will. They probably wont even have to spend much time or effort at it; I am lead to believe there are tools which specifically search packet streams for login credentials.

The hotel may have provided you with an authenticated WiFi link or even a Cat5 drop in the room but this may still cause issues. Can you trust the hotel’s own network? On at least one occasion when connecting to a wired connection in a hotel, I have discovered myself to be on a LAN consisting of all the other guests.

What you need is encryption.

If you establish and maintain an SSL connection with your blog’s webserver, the risks of digital eavesdropping are negated. If your server/host already has SSL installed, reconfiguring WordPress to work with it is pretty trivial. You can ask your host to install SSL and assuming you’re not on a shared host, this shouldn’t be a problem. You don’t even have to buy a certificate as you can sign your own. Self-signed certificates do have a drawback in that they cause an initial error message in the browser until you import the certificate. You should ensure that you import your self-signed certs over a trusted network.

To get WordPress (2.6+) configured for SSL, open your wp-config.php file and add the lines:

/** Force SSL login and administration */
define('FORCE_SSL_ADMIN', true);

…and save the file back on the webserver.

This forces the login window to go straight to an SSL connection and maintains the admin interface in one too. All data passed between your client machine and the admin interface, including your login credentials will be encrypted.

Have fun & be safe ๐Ÿ˜‰

How much power does a NAS use?

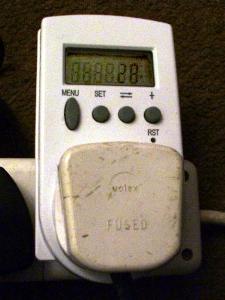
The other day, I took a walk into town and purchased one of these plug-in power meters. A relatively simple affair which you plug into the socket and then plug your device into. It has a digital display which, amongst other things, can display the instant Watts drawn by the connected device. This is exactly what I needed as I’ve been eager to find out how much power various devices around the home and office draw (and hence how much they cost to run ๐Ÿ˜‰ )

The meter seems fairly accurate on the Watts front. I tested it with some normal filament bulbs and the reading was just a few Watts higher than their ratings as is to be expected.

I then went on to test a NAS (Network Attached Storage) device which I had recently thrown together using an old Via Epia 800 Mini-ITX motherboard, a 80GB Maxtor* hard drive, a CD-ROM drive, a USB key and a Mini-ITX specific case with a 90W ATX PSU.

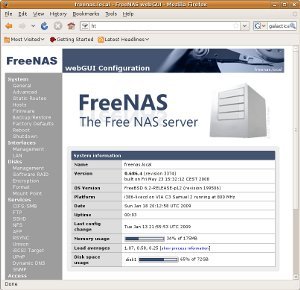
The software I used was FreeNAS 0.686.4. I used this version rather than the ‘bleeding-edge’ beta as I wanted to have the Wake-on-LAN functionality which now apparently missing on the latest version. FreeNAS boots from the CDROM and stores it’s configuration settings on the USB key. The whole lot runs headless and is configured by a lovely web interface.

FreeNAS

Now; back to the power meter ๐Ÿ™‚

I plugged the NAS into the meter and started it up. During boot, the system was drawing 50-55Watts and settled back to about 39 Watts on completion of the boot. This would tally with a reduced load on the CPU and the CDROM having spun down. When copying files at full-speed – the network interface is 100Base-T, the power consumption reaches the high 40s.

When idling, FreeNAS tries to conserve power. Unfortunately, the Epia 800 doesn’t seem to have any frequency stepping features and presumably maintains it’s normal 800Mhz clock speed. The hard drive does spin down and this brings current draw down to about 28 Watts – not too bad considering this is one of the older Mini-ITX boards.

Power meter - Sorry for the manky looking plug!

Power meter - Sorry for the manky looking plug!

Shockingly, however, when switched off the system is still drawing between 3 and 5 Watts. I haven’t been able to ascertain what causes the fluctation (signalling on the NIC perhaps or a dodgey PSU?) but it’s less than ideal to have it draw so much power when it is not in use.

I think I’ll spend some time looking at other hardware options for FreeNAS, possibly booting entirely from the USB key and eliminating the 5.25in CDROM would help. Other than that, I’d probably be looking at newer Epia boards to increase the energy saving.

*Yeah, I know, I wouldn’t normally use a Maxtor either but this one was donated. ๐Ÿ˜›

Packard Bell Easynote Keyboard Replacement MZ35/MZ36

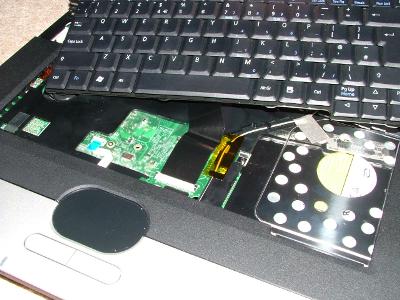
We recently had a Packard Bell Easynote (model identified as ‘Argo C2’ which seems to correspond with Packard Bell series MZ35 and MZ36 laptops) with a broken spacebar in for repair. We presumed it to be a complete keyboard replacement job so for your benefit, we detailed the procedure for getting the keyboard off the laptop.

easynote-c2

Tools required are basically a Phillips head screwdriver of suitable dimensions and a narrow, flat blade or similar prying tool.

We started out by turning the laptop over and removing the battery. The battery is located on the back edge and has a thumb-operated spring-loaded latch on the bottom surface of the laptop. The battery withdraws to the rear.

easynote-battery-removal

Next we needed to remove the keyboard retaining screw which (IIRC) is marked with a small keyboard legend. It is found roughly centrally on the underside of the laptop. Note that we had actually forgotten to remove the battery at this point /me smacks hands all round.

easynote-keyboard-retaining-screw

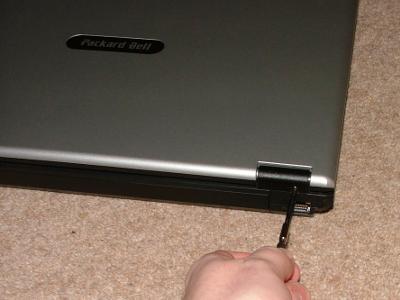
After putting the screw somewhere safe, we turned the laptop back over and with the lid closed, removed the hinge-cover retaining screws from the rear of the laptop.

easynote-cover-retaining-screw

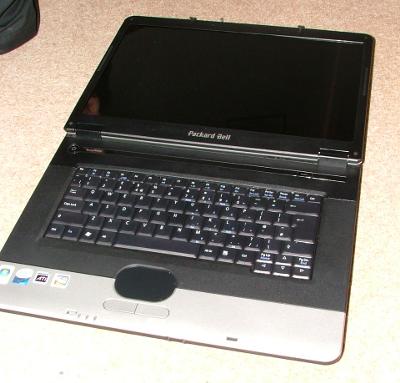
Next, we carefully opened the laptop lid all the way.

easynote-lid-open

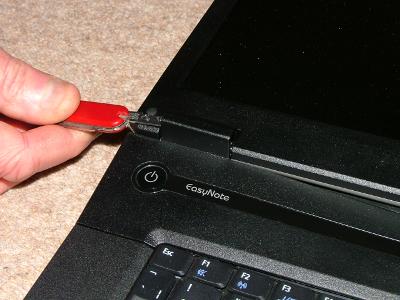
Once fully open, we used the prying tool to carefully lift the hinge covers which are an integral part of the upper cover on the laptop.

easynote-prying-up-the-cover

The whole cover should hinge from the keyboard side. We lifted the cover slightly and withdrew it away from the keyboard, towards the screen. The cover just removed acted as a secondary retaining feature for the upper edge of the keyboard.

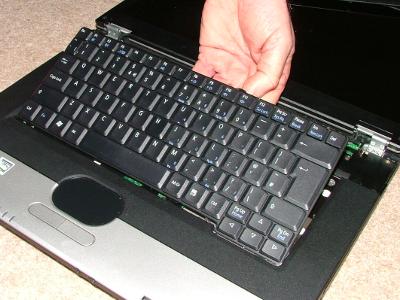
The keyboard was lifted from the edge nearest the screen, slight screenwards motion was employed to release the keyboard from the lower edge.

easynote-lifting-keyboard

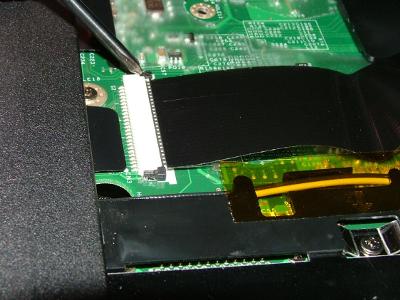
The keyboard ribbon cable is now visible. The ribbon is fastened using a black locking tab/collar.

easynote-keyboard-removal

We very carefully release the locking collar with a screwdriver. Usually working it back from each edge in turn works well.

easynote-keyboard-removal2

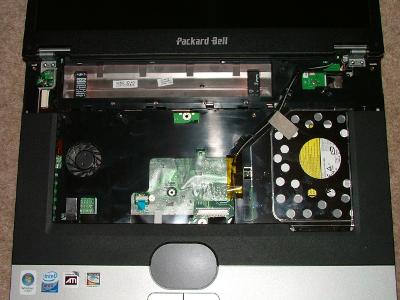
The keyboard could now be fully removed. The exposed internals of the laptop at this point are shown below.

easynote-keyboard-removed

The keyboard refitting procedure is the reverse of the removal procedure. Special care is to be taken when re-seating the ribbon cable and cover clips.

The usual disclaimer applies plus the caveat that it was a couple of months ago when this procedure was performed and my memory may be slightly rusty on it. Don’t forget, if your device is still under warranty, you’re best off getting a service call.

[ad name=”articlebox10″]