Using Linux to Identify Motherboard Model

The most obvious way to identify the make and model of a computer motherboard is to take the cover off the machine and have a look. However, sometimes this isn’t practical or desirable

Ideally, if you’re going to remove a cover from a computer you want to shut it down first. You could do it with the system still running but you’ve only got to drop a case screw into a turning fan to give yourself an expensive day

You may also be unable to directly access the computer which you wish to identify the motherboard within. It could be in another building on a distant site or installed in a server rack which could be time consuming to remove it from.

Linux and dmidecode finds your motherboard info

If your computer is running linux (and in this article we assume that’s exactly what it is running!) you can quickly and easily find the motherboard model using dmidecode.

dmidecode is a tool which interrogates the computer’s System Management BIOS from the command line.

It can read various hardware information with greater or lesser reliability. How solid the information is depends upon how much care and effort the hardware manufacture put into their product.

dmidecode your motherboard from the command line

dmidecode can read various records from SMBIOS but the one in which we are interested in is the motherboard.

To issue the command, you need root (or sudo) privileges either in a terminal on the local machine or via an SSH session remotely.

The required dmidecode command on linux to read motherboard information is:

dmidecode -t 2

If you prefer to be more verbose, the following command will have the same effect:

dmidecode -t baseboard

Where the -t 2 switch instructs dmidecode to read the 2nd table which is “Baseboards” or motherboard as we require.

This should print the motherboard information in a format similar to:

Base Board Information
        Manufacturer: ACME Motherboards
        Product Name: Motherboard 2000
        Version: 2.0
        Serial Number: 12345

dmidecode can also interrogate the SMBIOS tables for a lot of other information about installed hardware.

You can see all of the available tables which dmidecode can read along with the output options by issuing the command:

man dmidecode

Have fun talking to your system and if you use dmidecode for anything particularly clever, or find any unusual output from your system, let us know in the comments below!

Asus UX305 Screen Brightness Linux Control Fix

If you have an Asus Zenbook UX305 upon which you’ve installed Linux (in this case Linux Mint 18 Sarah) they you may have found that while practically everything works ‘out of the box’, screen brightness control with the Function keys does not.

In fact, on the UX305, I found that while Linux Mint would dim the display after a predetermined period, direct control over screen brightness was not possible using the system-settings panel or the taskbar widget.

After getting sore eyes from what is a very good backlight, I went off in search of a solution. I found a bug report discussing the problem on some newer Asus laptops in Ubuntu over at launchpad.net. The various methods being tried seemed to involve a bit of hit and a lot of miss depending on the hardware platform. However, I found a solution that worked for me with a UX305.

(The following assumes some competence dealing with your system’s internals and don’t forget to back up anything you cant afford to lose!)

To begin with:

Comment #10 on the discussion suggested the following:

In /etc/default/grub add (as root):

acpi_osi=

In the quotes on the line:

GRUB_CMDLINE_LINUX_DEFAULT “”

Not forgetting to then run

update-grub

After rebooting, I tried Function keys F5 and F6 and found they brought up the brightness level overlay and adjusted it but the actual backlight level stayed the same.

Asus UX305 Screen Brightness on Linux

The brightness overlay now working

Next, Comment #69 provided the solution to getting the backlight to actually respond to the backlight control.

First create a file called

20-backlight.conf

in

/usr/share/X11/xorg.conf.d

And add the following lines to the file:

Section “Device”
Identifier “card0”
Driver “intel”
Option “Backlight” “intel_backlight”
BusID “PCI:0:2:0”
EndSection

I then rebooted and found that the Function keys were happily now controlling not just the backlight overlay but the backlight itself.

🙂

It’s not impossible that this fix interferes with some other functionality but I’m yet to encounter any problems.

Classic Shell Windows 8

Windows 8 was a cheap upgrade path for me as the software that I wanted to run was no-longer supported by XP 64. That software, of course, was the sole reason for running Windows. Video games.

If you’ve tried Windows 8, you’ll probably have had the experience of booting up your desktop PC to what appears top be a tablet or smartphone OS and does nothing but get in the way of the normal desktop tasks you are used to. This ‘start page’, part of the Windows 8 Metro interface would be great if you were looking at 10″ portable touch-screen but the fact of the matter is, no matter how hard you prod your 23″ TFT, all you get are pressure splotches and the keyboard and mouse get lonely.

The term 'Metro' can bring back painful memories for some users.

The term ‘Metro’ can bring back painful memories for some users.

Fear not for help is at hand!

Help comes in the form a an open-source software project known as Classic Shell. This software allows you to return a Start Menu to it’s rightful place on the lower left of the taskbar and access your applications (I’ll choke if I have to now call them ‘apps’) in the manner in which you are used to.

Classic Shell also allows you to add back some popular features such as a full path and status bar to Windows Explorer and normal navigation on IE9.

Classic Shell Start Menu on Windows 8

Thankfully, I only really need Windows 8 as an engine for running games so I am spared the painful task of re-learning my workflow from scratch. I dual boot to Linux for serious tasks and with Gabe Newell’s pro-Linux stance for Valve and it’s Steam platform, the need for Windows in future will hopefully diminish.

Marvell SheevaPlug: Linux Powerbrick

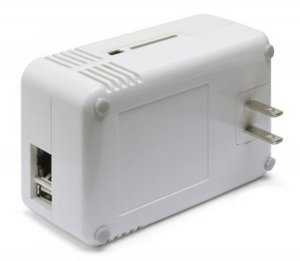
Marvell of the USA have announced a sub $100 (projected sub $50!) computer built into a ‘power-brick’ or ‘wall wart’.

sheevaplug-devkit

Bascially, the device is the size of a regular plug-in power adaptor and does just that; it plugs into the mains socket and runs. It’s power consumption is supposedly about 5 Watts.

  • 1.2Ghz ARM CPU
  • 512MB RAM
  • 512MB Flash storage
  • Gigabit wired ethernet
  • USB 2.0 socket
  • SDIO Expansion

Marvell already claim linux distributions to be running on the device and the possibilities for utilisation seem endless.

The $99 “development kit” is effectively a pre-release model and I’m really tempted to order one in to see what I can make of it.

Unfortunately, Slashdot got hold of this before I did so you will be able to see the Marvell SheevaPlug over at Linux Devices when their server stops smoking 😉

You also be able to order the SheevaPlug devkit directly from Marvell

Presario 2100 Frequency Scaling with Ubuntu

I recently installed Ubuntu Linux 8.10 on a Compaq Presario 2100 laptop. Specifically, this model of the 2100 series has an intel Celeron mobile processor which nominally runs a 1.7Ghz.

Naturally, on a laptop you don’t want to be running you CPU at full-chat all the time as the fan can be noisy and the flesh on your legs may burn. By default, Ubuntu didn’t work out how to step down the speed of the CPU which is unusual.

I could swear that I’d had this laptop throttling it’s cpu frequency before and with a little brain wracking and internet searching, I [re]found the solution.

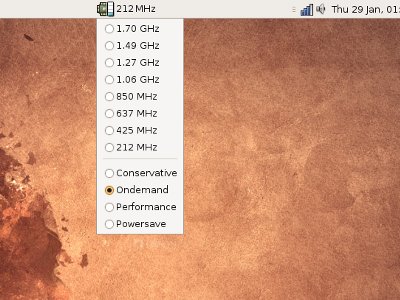
You need to activate the p4-clockmod module using the command sudo modprobe p4-clockmod. Once this is done, you can activate the Gnome panel cpu frequency applet (right-click panel>Add to panel>CPU Frequency Scaling Monitor)

cpu_widget_ubuntu

You should now be able to choose a speed from 1.7Ghz down to 212Mhz from the list or select one of the automatic speed governors.

You still need to make sure that the kernel module is loaded every time at boot time. To do this, use sudo gedit /etc/modules and add the line p4-clockmod.

Now, every time your machine starts, the cpu governors will be activated and you’ll hopefully have a quieter and cooler experience.